Text to Speech Converter in C#


Text to Speech Converter in C#

In this Article, We will learn How to create Text to Speech Converter in C# Windows Form Application using SpeechSynthesizer Class.

Let's Begin:
1) Create New Project -> Select Windows Form Application in C# -> Give it a name.
Add New Project Image
2) Drop RichTextBox and four Button Controls from the ToolBox.
Text to Speech Converter Image2
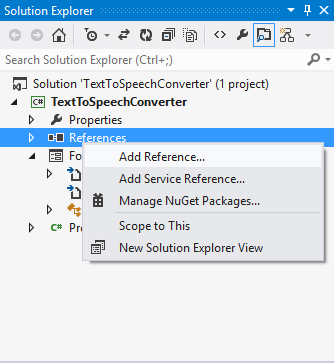
3) Right click on Reference Folder -> Click on Add Reference.
Add referece Image3
4) Select System.Speech Assembly and Click on OK.
Add Reference System.Speech Image4
After adding it, you will see System.Speech assembly under References folder.
System.Speech in Reference Image5
5) Go to Form1.cs(Code behind .cs file) and Add System.Speech(System.Speech namespaces contain types that support speech recognition) and System.Speech.Synthesis namespace (System.Speech.Synthesis namespace contains classes for initializing and configuring a speech synthesis engine and for generating speech etc.)
using System;
using System.Windows.Forms;
using System.Speech;
using System.Speech.Synthesis;
namespace TextToSpeechConverter
{
    public partial class Form1 : Form
    {
        public Form1()
        {
            InitializeComponent();
        }
        //SpeechSynthesizer Class Provides access to the functionality of an installed a speech synthesis engine.
        SpeechSynthesizer speechSynthesizerObj;
        private void Form1_Load(object sender, EventArgs e)
        {
            speechSynthesizerObj = new SpeechSynthesizer();
            btn_Resume.Enabled = false;
            btn_Pause.Enabled = false;
            btn_Stop.Enabled = false;
        }
       
        private void btn_Speak_Click(object sender, EventArgs e)
        {
            //Disposes the SpeechSynthesizer object
            speechSynthesizerObj.Dispose();
            if(richTextBox1.Text!="")
            {
                speechSynthesizerObj = new SpeechSynthesizer();
                //Asynchronously speaks the contents present in RichTextBox1
                speechSynthesizerObj.SpeakAsync(richTextBox1.Text);
                btn_Pause.Enabled = true;
                btn_Stop.Enabled = true;
            }
        }
        private void btn_Pause_Click(object sender, EventArgs e)
        {
            if(speechSynthesizerObj!=null)
            {
                //Gets the current speaking state of the SpeechSynthesizer object.
                if(speechSynthesizerObj.State==SynthesizerState.Speaking)
                {
                    //Pauses the SpeechSynthesizer object.
                    speechSynthesizerObj.Pause();
                    btn_Resume.Enabled = true;
                    btn_Speak.Enabled = false;
                }
            }
        }
        private void btn_Resume_Click(object sender, EventArgs e)
        {
            if (speechSynthesizerObj != null)
            {
                if (speechSynthesizerObj.State == SynthesizerState.Paused)
                {
                    //Resumes the SpeechSynthesizer object after it has been paused.
                    speechSynthesizerObj.Resume();
                    btn_Resume.Enabled = false;
                    btn_Speak.Enabled = true;
                }
            }
        }
        private void btn_Stop_Click(object sender, EventArgs e)
        {
            if(speechSynthesizerObj!=null)
            {
                //Disposes the SpeechSynthesizer object
                speechSynthesizerObj.Dispose();
                btn_Speak.Enabled = true;
                btn_Resume.Enabled = false;
                btn_Pause.Enabled = false;
                btn_Stop.Enabled = false;
            }
        }
       
    }
}
Final Preview:
Text to Speech Converter in C# Windows Form Application
Hope you like it. Thanks.

Simple Windows Form Login Application in C#


Simple Windows Form Login Application in C#

In this Post, we will learn how to create a Simple Windows form Login application.

Let’s Begin:
1. Create a New Windows Form Application.
Create Windows Form Application
2. Add New Database (I have created a database named as MyDatabase.mdf). Add a table (named as tbl_Login). The following is the table schema for creating tbl_Login.
Table Structure
3. Create a form (frmLogin) and add Label, TextBox and button control from the Toolbox.
Login Form
4. Add another Windows Form and named it as frmMain. This form will be shown to the user after successful Login by the user.
Main Form
Now, Go to frmLogin.cs code and add System.Data and System.Data.SqlClient namespace. Double click on btn_Submit to create btn_Submit Click event.
frmLogin.cs Code:
using System;
using System.Data;
using System.Windows.Forms;
using System.Data.SqlClient;
namespace LoginApplication
{
    public partial class frmLogin : Form
    {
        public frmLogin()
        {
            InitializeComponent();
        }
        //Connection String
        string cs = @"Data Source=(LocalDB)\v11.0;AttachDbFilename=|DataDirectory|\MyDatabase.mdf;Integrated Security=True;";
        //btn_Submit Click event
        private void button1_Click(object sender, EventArgs e)
        {
            if(txt_UserName.Text=="" || txt_Password.Text=="")
            {
                MessageBox.Show("Please provide UserName and Password");
                return;
            }
            try
            {
                //Create SqlConnection
                SqlConnection con = new SqlConnection(cs);
                SqlCommand cmd = new SqlCommand("Select * from tbl_Login where UserName=@username and Password=@password",con);
                cmd.Parameters.AddWithValue("@username",txt_UserName.Text);
                cmd.Parameters.AddWithValue("@password", txt_Password.Text);
                con.Open();
                SqlDataAdapter adapt = new SqlDataAdapter(cmd);
                DataSet ds = new DataSet();
                adapt.Fill(ds);
                con.Close();
                int count = ds.Tables[0].Rows.Count;
                //If count is equal to 1, than show frmMain form
                if (count == 1)
                {
                    MessageBox.Show("Login Successful!");
                    this.Hide();
                    frmMain fm = new frmMain();
                    fm.Show();
                }
                else
                {
                    MessageBox.Show("Login Failed!");
                }
            }
            catch(Exception ex)
            {
                MessageBox.Show(ex.Message);
            }
        }
    }
}
After that, go to frmMain.cs form and create btn_LogOut click event. On clicking the Logout button, frmMain form hides and show frmLogin form.

frmMain.cs Code:
using System;
using System.Windows.Forms;
namespace LoginApplication
{
    public partial class frmMain : Form
    {
        public frmMain()
        {
            InitializeComponent();
        }
        //btn_LogOut Click Event
        private void btn_LogOut_Click(object sender, EventArgs e)
        {
            this.Hide();
            frmLogin fl = new frmLogin();
            fl.Show();
        }
        private void frmMain_FormClosing(object sender, FormClosingEventArgs e)
        {
            Application.Exit();
        }
    }
}
Final Preview:
Windows form login application
Hope you like it. Thanks.

Insert, Update and Delete Record in DataGridView C#


Insert, Update and Delete Record in DataGridView C#

In this Article, we will learn How to Insert, Update and Delete Record in DataGridView in C# Windows Form Application. In Previous Post, we saw How to Create a simple Windows Form Login Application in C#.

Let's Begin:
1. Create a new Windows Form Application.
2. Create a Database (named as Sample). Add a Table tbl_Record. The following is the table schema for creating tbl_Record.
3. Create a form(named frmMain) and Drop Label, TextBox, Button and DataGridView control from  the ToolBox.
Now, Go to frmMain.cs code and add System.Data and System.Data.SqlClient namespace.
frmMain.cs Code:
using System;
using System.Data;
using System.Windows.Forms;
using System.Data.SqlClient;
namespace InsertUpdateDeleteDemo
{
    public partial class frmMain : Form
    {
        SqlConnection con= new SqlConnection("Data Source=.;Initial Catalog=Sample;Integrated Security=true;");
        SqlCommand cmd;
        SqlDataAdapter adapt;
        //ID variable used in Updating and Deleting Record
        int ID = 0;
        public frmMain()
        {
            InitializeComponent();
            DisplayData();
        }
        //Insert Data
        private void btn_Insert_Click(object sender, EventArgs e)
        {
            if (txt_Name.Text != "" && txt_State.Text != "")
            {
                cmd = new SqlCommand("insert into tbl_Record(Name,State) values(@name,@state)", con);
                con.Open();
                cmd.Parameters.AddWithValue("@name", txt_Name.Text);
                cmd.Parameters.AddWithValue("@state", txt_State.Text);
                cmd.ExecuteNonQuery();
                con.Close();
                MessageBox.Show("Record Inserted Successfully");
                DisplayData();
                ClearData();
            }
            else
            {
                MessageBox.Show("Please Provide Details!");
            }
        }
        //Display Data in DataGridView
        private void DisplayData()
        {
            con.Open();
            DataTable dt=new DataTable();
            adapt=new SqlDataAdapter("select * from tbl_Record",con);
            adapt.Fill(dt);
            dataGridView1.DataSource = dt;
            con.Close();
        }
        //Clear Data
        private void ClearData()
        {
            txt_Name.Text = "";
            txt_State.Text = "";
            ID = 0;
        }
        //dataGridView1 RowHeaderMouseClick Event
        private void dataGridView1_RowHeaderMouseClick(object sender, DataGridViewCellMouseEventArgs e)
        {
            ID = Convert.ToInt32(dataGridView1.Rows[e.RowIndex].Cells[0].Value.ToString());
            txt_Name.Text = dataGridView1.Rows[e.RowIndex].Cells[1].Value.ToString();
            txt_State.Text = dataGridView1.Rows[e.RowIndex].Cells[2].Value.ToString();
        }
        //Update Record
        private void btn_Update_Click(object sender, EventArgs e)
        {
            if (txt_Name.Text != "" && txt_State.Text != "")
            {
                cmd = new SqlCommand("update tbl_Record set Name=@name,State=@state where ID=@id", con);
                con.Open();
                cmd.Parameters.AddWithValue("@id", ID);
                cmd.Parameters.AddWithValue("@name", txt_Name.Text);
                cmd.Parameters.AddWithValue("@state", txt_State.Text);
                cmd.ExecuteNonQuery();
                MessageBox.Show("Record Updated Successfully");
                con.Close();
                DisplayData();
                ClearData();
            }
            else
            {
                MessageBox.Show("Please Select Record to Update");
            }
        }
        //Delete Record
        private void btn_Delete_Click(object sender, EventArgs e)
        {
            if(ID!=0)
            {
                cmd = new SqlCommand("delete tbl_Record where ID=@id",con);
                con.Open();
                cmd.Parameters.AddWithValue("@id",ID);
                cmd.ExecuteNonQuery();
                con.Close();
                MessageBox.Show("Record Deleted Successfully!");
                DisplayData();
                ClearData();
            }
            else
            {
                MessageBox.Show("Please Select Record to Delete");
            }
        }
    }
}
In the above code, I have created dataGridView1_RowHeaderMouseClick Event for updating and deleting the selected Record. When user click on the Row Header of any row then data present in the cell of the row is stored into the TextBoxes. DisplayData() method used to fill data in DataGridView. Clear() method clears the data present TextBox as well as in ID(int) variable.
Final Preview:
Hope you like it. Thanks.